Instructors have the ability to import all of the instructional content, events, and assignments into empty course shells for future courses. Our recommended procedure is to use the Import Course Content Canvas feature.
This 6-step checklist will walk you through using the Import Course Content tool. Follow these steps to optimize the course copy process.
STEP 1 - Delete Course Template Items
You will notice the UTS course template is applied to every new course shell in Canvas. Before importing any content into your course, delete and remove any and all of the course template items you will not use. This will reduce the amount of content you have to clean up after the import.
Go to each of these tabs and delete the template items included in them (If you do not plan to use them):
-
- Modules
- Pages
- Assignments
- Discussions
- Quizzes
STEP 2 – Use the Import Course Content Function
(Settings > Import Course Content). Keep in mind: you're copying into your new course site (with no materials in it) from your old course site (with materials in it).
-
- Enter your empty Canvas course site.
- In Course Navigation, click the Settings link.
- Click the Import Course Content link.
- In the Content Type drop-down menu, select the Copy a Canvas Course option. The screen will update with more options.
- Before searching for a course to copy from, check the Include completed courses check box. This ensures that you can copy course content from even your older Canvas course sites.
- In the Search for a course drop-down menu, select the course you would like to copy from.
- To import all content from the course, select the All Content radio button.
- If you want to select specific content, click the Select specific content radio button.
Note: If you select the "specific content" option, you are required to select the content you want to import after you review the remaining page options. After you start importing the content, the import selection cannot be canceled.
- Check the box next to “Adjust events and due dates” to make adjustments to the course date range. Select Shift dates to allow Canvas to pick dates within the set date range for all assignments and events OR select Remove dates to remove all dates from assignments and events.
- Click the Import button.
Depending on the size of a course site, it can take a while for all the materials to be copied. Therefore:
STEP 3 – Take a Break.
Give the course site time to copy. Get some coffee. Grab a snack!
STEP 4 – Check the course copy status.
The Current Jobs section displays the status of your import:
- View Queued
When an import is first uploaded, the status may display as queued or pre-processing.
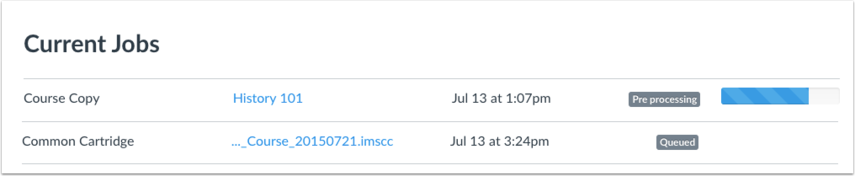
- View Running
When a report is uploading, the status displays as Running.

- View Waiting for Select
If you chose to select specific content as part of the import process, the current job shows as Waiting for Select, which means you must select the content you want to import before it can be completed. You cannot cancel this action. Click the Select Content button. Once you select content, the statuses will return to Queued and Running until Canvas imports the selected content.

- View Completed
When your import is complete, the status displays as Completed. A Completed status shown in orange indicate the import contains errors. To view the specific error(s), click the issues link.

- View Failed
If an import is unsupported or otherwise cannot be imported, the status displays as Failed. To view the specific error(s), click the issues link.

STEP 5 – Check for the copied materials.
Use the Refresh button in your browser window to get the most recent view of the course site. View the copied content by accessing any link in Course Navigation.
STEP 6 – Clean Up!
- Review Assignments, Quizzes, and Discussions.
- Verify activities to be used in the course are published.
- Verify instructions are accurate and well formatted.
- Verify the Assignment Submission Type. If you want to set up extra credit or “create a column” to manually enter grades, you will have to create a “No Submission” Assignment.
- Verify Assignment Groups are set up correctly. (Assignment Index Page)
- Verify assignments are weighted correctly, if using a weighted grading system. (Weight Assignment Groups)
- Verify Discussions are set up correctly. (Canvas Discussions)
- Verify Quiz “Options” are correct. (Canvas Quiz Options)
- Customize course navigation links. Keep only the links that are necessary. If using Modules, you can hide links to simplify navigation for students. (Reorder and Hide Course Navigation Links).
- Verify Modules are logically ordered and published, if using them.
- Verify Module requirements and prerequisites are set correctly, if using them. (Module Requirements and Module Prerequisites)
- Verify the course Home page is setup correctly. (Home Page Layout Options and Course Home Page)
- Use “Student View” to review the entire course. This is a good time to verify that all of your content is available in an accessible format. (Student View)
- Adjust dates. Dates must be checked and corrected to reflect the actual calendar days in the new semester.
- Course Breaks & Holidays - Update any Calendar dates to reflect the new semester's course breaks and holidays.
- Modules - If specific dates are associated with individual modules, update those dates.
- Pre-planned Announcements - If the Canvas course has pre-planned announcements (reminders of assignments or information that is released at specific times), check the accuracy of release dates in the new semester version.
- Check for Broken Links: All links in your online course content need to be checked before the course is published and students begin accessing course materials. Click Settings. Click Validate Links in Content. Repair broken links accordingly.
Additional Considerations/Suggestions
INSTRUCTOR CONTACT INFORMATION
Update instructor contact information for the online course, including preferred methods of communication.
INSTRUCTOR OFFICE HOURS
Update the office hours information for the instructor. Such information may be in the Syllabus or other pages found in the Canvas course.
FIX COPIED GROUP ASSIGNMENTS
If you copy a group assignment or discussion from another course, the groups themselves will not appear in the new course. Groups in the new course need to be set up manually.
INSTRUCTOR PERSONALIZED VIDEO CONTENT
When copying a course into a new semester, an opportunity to more thoroughly engage students is possible. As an instructor, consider updating or adding personalized video content for the new semester version. For example, add a faculty introduction video.